 This is not my recipe! You can find the original recipe at http://fluffychixcook.blogspot.com/2012/05/revolutionary-low-carb-hot-dog-buns.html.
The photos are also do not belong to me, they belong to the other blog :)
Mine did not come out as brown as hers. I think I will cook mine a little longer next time. They were like a really fluffy egg, but did have kind of a bread texture. I made a sandwich with one today, and it was really good! I will definitely make them again!
Revolutionary Wraps and Hot Dog Buns
Serves – 8-10 Hot Dog Buns or 12 Hamburger Buns
Difficulty – Easy
Prep Time – 15 Minutes
Cooking Time – 40 Minutes (Hot Dog Buns)
 |
| Any shape. Any size! Low Carb Bun shapes are versatile. |
Ingredients
8 Large Eggs, separated
5/8c Cottage Cheese (any kind - recipe used Whole Milk)
1-1/8c Mozzarella Cheese, shredded
½ tsp Granulated Garlic
¼ tsp Granulated Onion Powder
¼ tsp Kosher Salt
1 scoop Protein Powder (about 30g or 1/4 to 1/3c, scoop comes with protein)
¼ tspCream of Tartar
1-1/2 tsp Country Dijon (optional)
2 tsp Baking Powder, Gluten Free, non-aluminum
Sesame Seeds or Poppy Seeds, optional (about ¼ tsp. per roll and 1Tbsp per Focaccia recipe)
Preheat oven to 325°. Line baking sheet and with parchment paper or aluminum foil and set aside.
 |
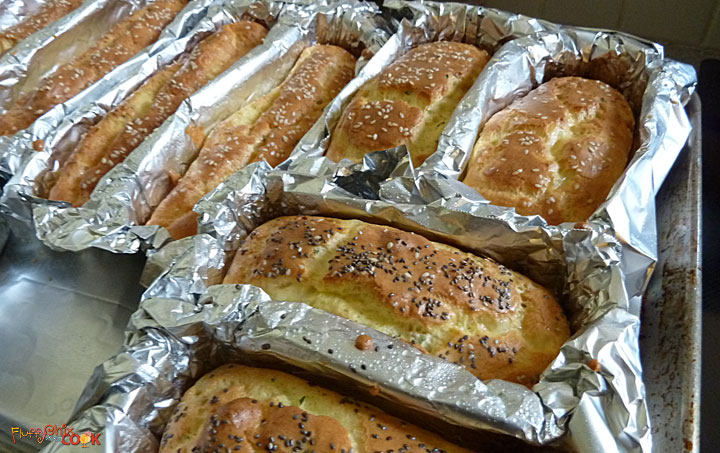
| Make bun molds from non-stick aluminum foil and any shaped item in the house. Spice jars make great shapes! |
(Note on shaping: Make sure to make 2 molds per sheet of aluminum foil so they don’t fall over. Two will create a more steady shape and will retain a curve easier. )
If using non-stick aluminum foil, no need to spray molds with cooking spray. If using regular aluminum foil, then spray molds with olive oil spray and set aside on baking sheets. (But you should really use the non-stick aluminum foil…)
 |
| Yolk Mixture for Low Carb, Gluten Free Revolutionary Buns and Wraps. |
Grate mozzarella cheese.
Blend cottage cheese with a small food processor until smooth.
Grind pork rinds into crumbs with the knife blade of the food processor (if using them).
Measure coconut flour (if using) and sift into dry ingredients.
Measure out protein powder,
salt, garlic and onion powders and mix with dry ingredients to combine.
Separate egg yolks from whites and place into two very clean, oil free pans.
Add cheeses and dry ingredients to the bowl with the yolks and set aside. You will beat this after whipping the egg whites – unless you want to thoroughly wash your beaters in between! (Remember the beaters used for the egg white must be scrupulously clean and dry before beating the whites.)
Beat egg whites to the foamy stage and then add cream of tartar. Beat whites to a hard peak stage. Go look at the instructions in the Basic Rev Roll technique post if you have any doubts about whether you’ve whipped them enough. When they are ready, the whites will no longer move in the bowl. No slippin’ or slidin’ for those egg whites!
Blend egg yolk mixture for 2-3 minutes. The yolk mixture is ready when they change to a lemony color and when the lumps of shredded cheese are mostly gone. It doesn’t have to be perfect!
Fold the whites into the yolk in 3 additions. The first one loosens the yolk mixture and the other two are to add volume so don’t overwork!
 |
| Top low carb buns with sesame, poppy or chia seeds! |
Sprinkle buns with sesame or poppy seeds, or rehydrated minced onions – whatever you want, add fresh herbs or cracked pepper and coarse sea salt!
You’ll get about 8-10 good sized buns depending on how big you made your molds.
Bake rolls at 325° for 35-40 minutes or until golden brown and done throughout. If using two baking sheets, rotate the pans between the two racks of your oven at the 17minute mark!

Buns and wraps are best made hours before or even up to 4 days ahead. Store the buns and wraps in an air tight bag or container in your refrigerator. They become soft and sturdier with age, resisting tears and breaking.
Nutritional Information
Single Serving - 1 Bun or 1 Wrap

Full Recipe


